Flourless Chocolate Torte (Gluten Free)

  
Okay, here is my disclaimer; I’ve said it before, and I’ll say it again: I have nothing against gluten.  I love the stuff (stretchy, chewy white bread? Yes, please!).  Still, sometimes I happen upon a fantastic little recipe that is coincidentally gluten free, and it is a double score seeing as I have other people in my life who (sadly) need to avoid the stuff for health reasons.

Last week was my grandma’s 87th birthday.  She and I have always been close, and I can say that we have only grown closer  as I’ve  become an adult.  We enjoy long evening  chats on the phone even though she only lives a few minutes away–we talk about the kids, or current events, or family history research (a mutual passion), or thrift store shopping, or anything, really.  She still lives on her own, drives, eats out, goes to movies at the Cineplex with her girlfriends, and shops up a storm.  She also loves to get down on the floor and play with her great-grandchildren.  Can you see why I love her so?  And so, when her birthday came around on January 4th, I knew I had  to track  down a really fantastic gluten free dessert recipe for her because, in addition to all those other wonderful things about her, she also has celiac disease, which means she cannot eat gluten (boo!).  

Now, in the past, I’ve tried all the usual suspects at family gatherings: black bean brownies (not a favourite), quinoa chocolate cake (was unpleasantly crispy and gritty), and garbanzo bean chocolate cake (while us girls didn’t mind that one, the boys were too disturbed by it).  So,  I thought I would try something a little more traditional this time, and I found THE. BEST. FLOURLESS. CAKE. EVER.  In fact, I’m kicking myself that I tried all those beany alternatives in the first place, ha!

This recipe is transcribed from my cooking journal in my own words but is only barely adapted from its original (which can be found here from Allrecipes user, Shana Hillman).  Although I do have a new digital kitchen scale care of my wonderful husband and his Christmas shopping, I weighed out the skimpy amount of chocolate asked for by the recipe and was horrified at how little it seemed to be (you do remember I’m a full-fledged chocoholic, right?).  I also never have proper baker’s chocolate in the house.  So, instead, I just used my own judgment (aka greed) and subbed in half a cup of semi-sweet chocolate chips.  I also had a different sized cake pan so used that instead and just kept my eye on the cooking time (I’ve made this twice now, and in my oven, 28 minutes in a 10″ pan makes this torte to perfection!).

So, it’s Friday night, and I think this is exactly what you need in your life after your first full week back to the grind since the holiday season came to a sad end a few days ago.  Scrounge your pantry or fridge for these few simple ingredients, cozy up to your significant other (or cat), invite all the neighbours or nearest celiacs over (or don’t), and pour some of that good espresso (or wine).  Also, don’t forget a dollop of something creamy on the side, be it whipped cream or scrounged leftover candy cane ice cream like I’ve used both times–it perfects the entire thing. Your first bite will be the highlight of your entire week, I promise.  TGIF!

Flourless Chocolate Torte

1/2 cup semisweet chocolate chips

1/2 cup butter

3/4 cup sugar

1/2 cup cocoa powder

3 eggs, beaten

1 tsp vanilla

  1. Heat oven to 300 degrees F.  Grease a 10″ round cake pan with butter and then coat it in cocoa powder by shaking and tapping it around the whole pan (bottom and edges).
  2. Using a double boiler method, melt together the chocolate chips and butter.  Remove from heat and let cool slightly.
  3. Once somewhat cooled, stir in the remaining ingredients slowly, taking care not to scramble the eggs.
  4. Pour into prepared pan and bake 25-30 minutes, or until an inserted toothpick comes out clean.  Let the torte cool in its pan for 10 minutes, then turn it out onto a plate.  It may be served warm or cooled.  Serve with powdered sugar overtop, or else with a dollop of whipped cream or ice cream.

4 Comments

Filed under Chocolate, Gluten-Free, Recipes, Sweets

Happy Ukrainian Christmas! 

  Today is Ukrainian (aka Orthodox) Christmas, and I always like to pause my day on this occasion every year and give it a bit of special consideration and reflection in my heart. It’s a great way of remembering my Baba and some of the traditions I hold so dear, even though for practical reasons my family has always celebrated on regular Christmas Eve, December 24. In honour of this day, I wanted to post a little snippet from my journal this past Christmas, when I reinstated a very old tradition–making the ritual bread–for our Christmas Eve celebration. It’ll be something I do from now on in Christmases to come. Merry Christmas!

+ + + +

Tonight is one of my favourite nights of the year. Tonight, the Ukrainian side of my family celebrates with the Sviata Vechera (“Holy Supper”). I still remember celebrating this day as a child when my Baba and Gido were both alive. It is a marvel that my Baba continued to cook all twelve meatless dishes alone every year even as our family grew and grew and grew. For me, nowadays, celebrating this day with my cousins is an important bit of symbolism, a nice reminder of my faith, and a tether to my Baba and Gido and the traditions they passed on to us while they were alive. 

As a child, I remember being sent to the stoop to look for the first star in the sky, a reminder of the Bethlehem Star, which would mark the start of dinner. In my youngest years, I remember all of us fitting in my Baba’s tiny kitchen to eat, with the traditional hay under the table as a nod to the animals that hosted Christ in their stable (in later years, as the family grew, we had to eat in the carpeted living room, and the hay tradition went away). 

Each year, our meal starts with Kutia, a simple dish of boiled and cooled wheat in honey water (which squeaks on your teeth as you eat it!). We then have the other favourite meatless dishes: fried fish, nachynka (a cornmeal casserole and my personal favourite), holubtschi (plain cabbage rolls with rice and onion filling), fasoli (mashed beans), mushrooms in cream, and–of course–pyrohe (perogies both onion and potato), just to name a few. A jar of raw chopped garlic is on the table as a wish for good health (and as a condiment for everything!), and bread is always present in some form. 

This year I’ve decided to bring something that hasn’t been brought since my Baba had to stop cooking the meal many, many years ago: I am making and bringing the ritual bread, a Kolach. This bread is circular as a sign of eternity and is braided with three strands to symbolize the Trinity. A lighted candle is placed in the middle as a reminder of the Bethlehem Star.

I always feel close to my Baba when I cook her foods. I remember her warm, hospitable heart and arthritic hands that worked tirelessly with love for her family.

More than any nativity scene or Christmas movie, these annual Holy Supper rituals also bring me closer to Christ, remembering his humble birth and all that it has done for us ever since–such as bringing peace, joy, and a very true sense of relationship to my life.

So, from me to you on this very special day, here is another phrase from my childhood, one that my multi-lingual Gido shared with me decades ago: Khrystos Rodyvsya! Christ is born! I hope it gives you reason to celebrate, too :)

Leave a comment

Filed under Holidays, Musings

Ice-Side Gratitude

  
It’s public skate day at the rink, and it makes you feel alive just to see it. From the ultra young to the super old, people of every age and ability strap on their blades and glide to the ice–gracefully, tentatively, precariously, confidently.  A girl no bigger than two years old skates laps around those many years her senior, a winter fairy afloat on the frost.  An elderly man, cane in hand every step of the way, inches his trail around the boards, and from  my spectator’s seat, every breath I exhale is a security prayer for him til he makes it  back, benchside, without a slip.

My own Amelia, in all five of her years, is at the pony-legged beginner stage, clomping her hockey hooves at an inchworm’s pace but with proud smiles and thumbs up all the way around.

Teens glide absent-mindedly, channeling more attention to their phones than to their feet.  A skate-clad dad sips a smuggled coffee as he soars, never spilling a drop.

There are people of every creed, every colour, every clan.  There are those clad in face-caged helmets, those with curls flowing freely, the fashionistas in coordinated tunics and legwarmers, those in full snowsuits, and those jersied-up.

It’s our Canada in one snap, this human carousel falling into rhythm in their circular, clockwise parade ’round the oval (until the half past buzzer chimes their reverse).  They smile as they skate, hand in hand, three abrest, in a race against themselves or the beats upon their earbuds, the man in a beard, the young woman in hijab, the Asian grandfather, a Somali youth, a sea of smiling children.

On the bench outside the boards,my heart grows warm despite the chill against the glass.  What a beautiful country I’ve been gifted, with such a beautiful life therein.

Leave a comment

Filed under Musings

Gnocchi: Repurposing Holiday Dinner Leftovers

gnocchi
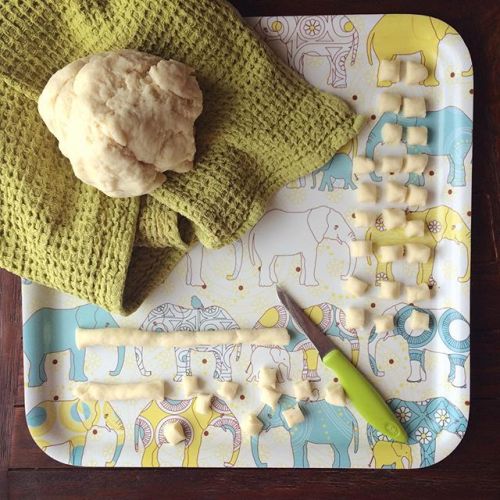
I’m really fortunate that no one in my household is fussy about leftovers.  I know there are some folks that hate eating leftovers (and to those people, I say: you must not be the daily cook then!  If leftovers mean the occasional night off cooking, then I’m all about them…), but in our house, they get eagerly gobbled up.  Holiday dinner leftovers are no exception (in fact, they are highly anticipated!).  However, we always seem to have a holiday-dinner-mashed-potato conundrum.  By that I mean I always make too many, and the leftover gravy always runs out far before the clumpy bowl of mashed potatoes does.  So, I’ve gotten handy at repurposing the mashed potatoes that are inevitably still left pasting themselves to the fridge shelves long after the turkey has undergone its final gobble.

Leftover mashed potatoes make fantastic perogy filling or potato pancakes.  You can also fry them up in a skillet as part of a breakfast hash.  However, by far, my favourite way to use up leftover mashed potatoes these days is for making gnocchi.  The recipe itself could not be simpler, and the process is also a relatively low amount of work for the pillowy payoff of having these fresh clouds of pasta on your plate in a jiffy.  Gnocchi happily freezes for a lengthy amount of time and can be prepared by the handful for flexible portioning.  It also cooks in just a couple minutes (it is done once it floats to the top of salted, boiling water).

gnocchi3

To sauce your gnocchi with whatever you like best, warm your favourite sauce in a skillet or saucepan on a side burner.  Then, once your gnocchi float, use a slotted spoon to simply drag them on over into the saucepan along with a little bit of their own starchy cooking water.  Let the sauce and gnocchi come to a boil and then reduce to a simmer for a couple more minutes.  The starch from the pasta will simultaneously thicken and thin the sauce to perfection, and the gnocchi will be perfectly coated in sauce rather than becoming clumped up pucks of dough.

So, make your three-weeks-from-now self incredibly happy.  Grab that last sad lump of mashed potatoes from your Christmas chafing dish, knead in an egg and a bit of flour, roll it into a few long ropes, and run your knife down the cord, slicing off pillows in a jiffy.  Then, spread them in a single layer on a baking sheet to flash freeze them before bagging for a “rainy day” (but, if you’re like me, these don’t last as long in the freezer as I would ever like–they’re that good ;)

gnocchi2

Gnocchi

1 cup leftover mashed potatoes

2 cups flour

1 egg

  1. In a mixing bowl, combine the ingredients.  Once stirring becomes difficult, turn the bowl contents out onto the counter and knead by hand to fully combine.  Dough will seem too dry and crumbly at first, but do not add extra liquid; continuing to work the dough by hand will extract more moisture from the potatoes and it will come together nicely after a few minutes.  Knead until the dough is fully combined, forming a nice moist ball.
  2. Rest the dough for a few minutes beneath a tea towel.
  3. Break off small bits of the dough ball at a time, leaving the rest beneath the tea towel while you work.  Roll out long ropes of dough. Use a knife to cut off evenly-sized chunks.  Repeat with all the dough, placing the gnocchi in a single layer on a baking sheet once they are cut.
  4. Freeze the baking sheet until the gnocchi are no longer tacky.  Then bag them up and freeze for up to several months.
  5. When the time comes to cook, boil the gnocchi in salted water.  When they float to the surface, they are ready to sauce and eat.
picnic1

Living room picnic for the kiddies; a handful of gnocchi with leftover sauce for mama. Things don’t have to be a lot of work to be fantastic ;)

2 Comments

Filed under Freezer Meals, Leftovers, Pasta, Uncategorized

Big Batch, No-Fuss Chili

chili

Chili is one of those things kind of like spaghetti sauce–everyone has their own take on it and, in my opinion, there kind of isn’t any one way (or any wrong way, for that matter) to do it.  This is the chili recipe I’ve been making (without a recipe) for years.  It’s a “little bit of this, little bit of that” type of recipe that I can most often make with ingredients I have on hand after my monthly stock-up on essentials (frozen beef, canned beans, and fridge veg).  I like that, once the carrots and onions are sweated, this is a hands-off recipe that sits on simmer and does its own thing.  I also love that it typically makes about three large dinner portions so that I can tuck some away into freezer containers for easy no-cook dinner days.

In this photo, I’ve photographed the chili by itself, where you could eat it with some good buttered bread for dunking, but most frequently I serve it either over rice or over spring mix salad (or, my favourite combination is layered: rice on the bottom, chili on top of that, and a handful of spring mix or baby greens on the very top, so they provide a great fresh/crunchy/wilted combination–yum!).  Add a squeeze of lime overtop of the entire thing and I am one really, really happy camper.

Also, with a huge recipe like this, consider making your own microwavable work lunches for later in the week or month.  Back when we were newlyweds, we spent so much money on those Michelina’s type lunches which are so exorbitantly expensive (not to mention tiny and still filled with many days’ worth of your recommended sodium intake!).  So, I bought some reusable containers and began strategically socking away a few “frozen dinners” each time I made a large batch of something (think: rotini and spaghetti sauce, rice and stir fry, soup, chili and rice, and so on).  I label and date these and chuck them into the freezer whenever we have a tiny bit of something left over from dinner and voila!  Two weeks from now you won’t even feel like you’re eating “leftovers” when you enjoy a home-cooked meal at work (warning: your co-workers eating a handful of trail mix and a single Gogurt may hate you a little as they drool with envy).

So, without further ado, here is my favourite version of chili, which is light on the meat and heavy on the beans and veg, with a thin little sauce good for sopping up with carbs.  Also, I make it slightly differently each and every time I make it, so feel free to throw in whatever you might be wanting to use up in the pantry or fridge (extra chick peas, a hunk of sweet potato, different types of peppers, some kale etc).  Enjoy!

Big Batch, No-Fuss Chili

1 lb ground beef

1 tbsp olive oil

3 carrots, diced

1 medium yellow onion, diced

28 oz can diced tomatoes with their juices

2 cans of mixed beans (I use a 6 bean medley), drained and rinsed

1 can of red kidney beans, drained and rinsed

2 sweet bell peppers (any colour), diced

3-4 tbsp cumin

3-4 tbsp chili powder

1 tsp salt

½ tsp pepper

2 cups kernel corn (canned or frozen)

2 cups water

  1. In a frying pan, cook ground beef until no pink remains.  Drain grease and set aside.
  2. Meanwhile, in a large pot, heat olive oil and sweat onions and carrots over medium heat (do not brown them).  Once they have softened, add in all the beans (drained & rinsed) and the tomatoes with their juices.  Scrape down the bottom of the pot.  Add in cooked beef, chopped bell peppers, cumin, chili powder, salt, and pepper.  Cover with approximately 2 cups of water.  Stir to combine.  Bring to a boil and then reduce to simmer, partially covered, for at least 20 minutes or until veggies are fork-tender and flavours have combined.
  3. Five minutes before serving, add in the corn.
  4. Right before serving, check the spices and seasonings, and adjust to taste.
  5. Serve with bread, rice, or baby greens with a squeeze of lime.


Leave a comment

Filed under Freezer Meals, Low Prep, Make Ahead Meals, Recipes, Southwestern, Stew

Spiced Sweet Potato Tacos with Grapefruit Salsa (Meatless & Gluten Free)

potatotacos
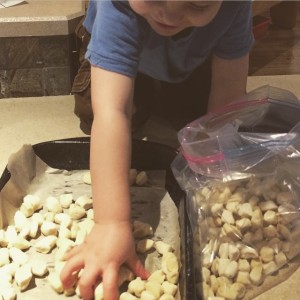
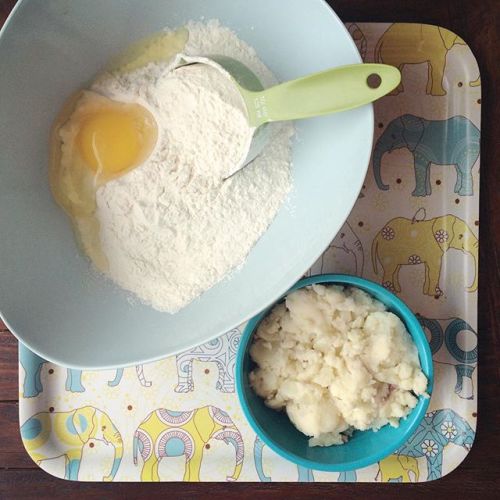
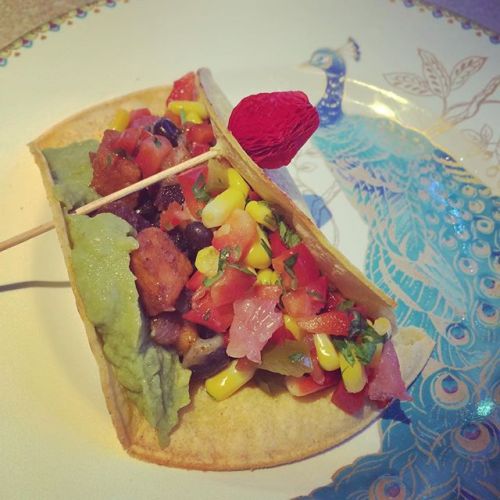
If you’re anything like me, please don’t cringe at the title of this recipe.  Don’t get me wrong–I love gluten (and meat, for that matter) as much as the next guy.  However, my grandma has celiac disease and so I’m well familiarized with going to great lengths to ensure things like holiday and desserts don’t contain any glutinous contaminants that can really detrimentally affect her health.  Likewise, I have several friends who follow a wheat-free diet, so anytime I find a flourless recipe, I store it away in the back of my mind for nights they may come to visit.

As far as the whole meatless thing goes, we try to eat meatless 1-2 times a week for a number of reasons: for our health, for the environment, and for our wallet!  Going meatless is also just an interesting way to push our food horizons as cooks and eaters since it often means paying more attention to the flavour and texture of other elements of dinner rather than just relying on a hunk of meat to fill that void.  And, while we’re at it with buzzwords, I should mention that the only non-vegan ingredient in today’s recipe is a handful of cheese, so if you would prefer a vegan taco option, simply omit the cheese or substitute in your favourite vegan-friendly cheese substitute, and you’ll love this dish as well!

When I made up this recipe yesterday, it wasn’t to intentionally have it be gluten- or meat-free.  It actually just coincidentally ended up that way as I attempted to use up things we already had in the fridge and to avoid going to the store as we enjoyed a totally lazy day at home.  Corn tortillas are a staple that we always keep in our freezer–with those on hand, you can eat fridge tacos (made of whatever odds and ends are left in your veggie drawer) on a whim by just defrosting a small number at a time.  If you’re in Edmonton as I am, you can find small corn tortillas at The Italian Centre in a huge 4lb pack of about 100 shells or so (they are in the refrigerated section not far from the cheese–at least at the West End location).  My grandma first discovered these as they are certified gluten free, and once we fried some up at home, we decided we’d never go back to flour shells for our soft tacos, either.  They’re that good.

Using what I happened to have in the fridge yesterday included using up the orange and purple sweet potato knobs and cilantro I had leftover from the Soul-Soothing Peanut Soup I made earlier this week.  I hate to let anything in my veggie bins go to waste, so why not find a way to repurpose your leftovers whenever possible?  I frequently make what I call “fridge tacos” at the end of the week, using up any leftover meats, veggies, and cheeses I have from the other dishes I’ve prepared during the week.

For me, the perfect fridge taco is comprised of three parts:

  1. fridgeleftovertacos2warm, hearty layer (such as leftover chicken, pulled pork, or, in this case, the earthy sweet potato filling)
  2. a cold, crunchy & bright micro-diced raw fruit and veggie salsa (think cabbage with apples and lemon; or corn, celery, and cucumber in lime juice; or cherry tomatoes with mango; and so on)
  3. the garnish (guac/sour cream/plain yogurt/taco sauce/cilantro/a squeeze of lime/a sprinkle of cheese)

If you follow this simple methodology, you’ll begin to see endless taco combinations take shape within your fridge as the week progresses.  The best part about it you don’t have to have a large amount of any one thing–literally a half a cucumber, half an apple, and a single celery stick can create a fantastic salsa.  In the same way, don’t throw out the extra steak that your kids barely touched–it can be repurposed as tacos in a jiffy!

In terms of adding flavourings, you’ll never go wrong with chili powder, cumin, and cilantro (I’ve even added a pinch of cinnamon from time to time).  Citrus juice or vinegar bring most salsas together with a quick-pickling action, mellowing ingredients like raw peppers or onion.

I encourage you to give this recipe and other fridge tacos a try (and keep me posted on your favourite fridge combos!).  As we remarked last night, on a chilled out Friday night at home, eating this kind of food at home on a weekend evening makes us not even miss eating out most of the time. And we didn’t miss the meat (or gluten) one bit.  Just add your favourite cocktail and you’ll be completely set for the perfect weekend night “in” ;)

Meatless Sweet Potato Tacos

1 tbsp olive oil

1 small yellow onion

1 small orange sweet potato

1 small purple yam

2 cloves garlic, minced

1 tbsp cumin

1 tbsp chili powder

1 can black beans, drained and rinsed

salt and pepper

2 handfuls shredded cheese, any type


Grapefruit Salsa

½ red bell pepper, diced small

½ grapefruit, supremed and diced small

½ cup kernel corn

3-5 pickled jalapeno rings, diced small

½ bunch of cilantro, chopped

juice of ½ grapefruit

splash of pickled jalapeno juice from jar

salt and pepper


Also

8-10 small corn tortilla shells

guacamole

  1. To make the salsa, dice and combine all ingredients (red pepper, grapefruit, corn, jalapeno, cilantro, grapefruit/jalapeno juice).  Season to taste with salt and pepper.  Set aside in fridge to chill and allow flavours to combine as you prepare the cooked portion.
  2. Heat oil in pan.  Sauté chopped onion and sweet potatoes over medium-low until they soften and begin to caramelize, about 5 minutes.  Add in minced garlic and sauté until fragrant and golden.  Add in a splash of water (about 1/3 cup or so) and scrape the browned bits off the pan, then cover with a lid and allow the sweet potatoes to steam until done (test for doneness by inserting a fork).  Remove the lid, add in cumin, chili powder, drained beans, and salt and pepper to taste.  Cook on low heat until flavours combine and any remaining liquid evaporates (this will make the filling more “meaty”).
  3. Meanwhile, heat corn tortillas in a skillet with a touch of cooking spray.  Turn them when slightly browned so both sides become slightly crispy and have them ready to load up as soon as they come off the heat.
  4. While shells crisp, adjust sweet potato seasoning if needed, then cover the pan of filling with two handfuls of shredded cheese.  Remove from heat and cover with a lid, allowing the residual heat to melt the cheese layer until you are ready to serve. (NOTE: To make this a vegan dish, simply omit this cheese or use a vegan-friendly cheese substitute).
  5. Serve tacos shells filled with a large spoon of the sweet potato filling, a dollop of guacamole, and topped with a large, drained spoonful of the fridge salsa.

Makes approx 8-10 tacos, with the potential for a little extra sweet potato filling to freeze for another day.

fridgeleftovertacos

Other fridge taco potential–the combinations are endless


1 Comment

Filed under Gluten-Free, Meatless, Southwestern, Tacos, Uncategorized, Vegan, Vegetarian

Christmas Tree Pompom Craft

pompomchristmasWe tend to do crafting activities fairly regularly at my house once the cold weather hits. The kids love the hands-on activities and I’m glad for activities that ground and focus and quiet them, especially when the baby’s napping. That being said, I’ve definitely bit off more than I can chew with certain complex craft activities over the years, running around like a chicken with my head cut off, in full damage control mode (leaving my dining room looking like a warzone after).  That’s why, when I find a low-key craft or hands-on activity, I tend to milk it for all its worth.

Three years ago, when my now-kindergartener was a busy two year old and big sister to a brand new newborn brother, I made a set of homemade magnetic pompoms one evening to help keep her busy while my hands were tied up. This cheap craft cost me only $2 to make; I paid one dollar for a pack of dollar store pompoms and a second dollar for a roll of magnetic stripping. The magnet strip is set up like tape (you peel the paper backing off and can mount it to a variety of things)–however, for my purposes I had to add a tiny bit of hot glue. And so, one quiet evening, I spent the 10 minutes or so cutting off little chunks of magnets and hot gluing them to the backs of the multi-coloured, multi-sized pompoms.

The result was a set of inexpensive magnetic pompoms that I could store away literally for years. Every so often, I’ll pull out the old tin I keep them in, give the kids a cookie sheet, and let them go crazy. They’ve played pattern games with them (big, small, big; or red yellow yellow red); they’ve made snakes and worms and caterpillars and “traffic jams”; I’ve drawn a bunch of lonely hanging strings on a piece of paper and they’ve added pompoms to create a balloon bouquet scene; I’ve drawn circles on  hand drawn Easter egg pictures and let them “decorate” the egg with pompoms–either randomly or using a pattern. A magnet board or the side of the fridge would also work just as well as a cookie sheet, but I like the cookie sheet because it is (1) free and (2) lap-sized (I have a mini cookie sheet that’s a particular fan favourite).

At Christmas time (for two years running now), I like to create a Christmas tree silhouette out of construction paper, tape it to the cookie sheet and simply leave the whole setup nonchalantly sitting out within reach (this is an activity technique called “strewing”, where you stategically strew some interesting materials about but don’t hover over to ensure they are used “properly”). In the spirit of discovery and curiosity, the kids never waste any time figuring out that they would like to decorate the tree with their magnetic pompoms! It’s fun to watch how they load it up–sometimes they decorate only the tips of the tree and other times they mapompoms
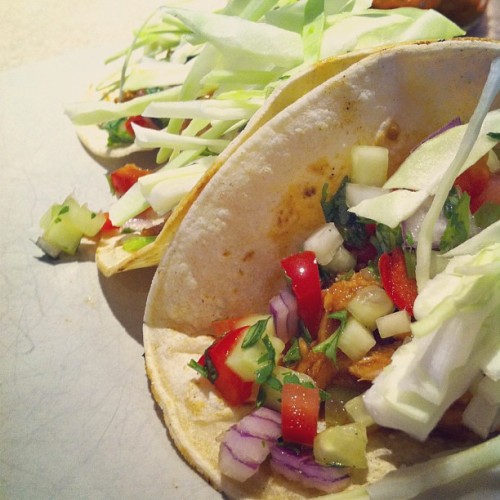
x the whole thing out like a full Bingo card.  If the kids tire of a Christmas tree, I’ve also done a snowman shape, letting them add eyes, buttons, etc.  Or, draw the roofline of a house, adding circles for a strand of Christmas lights, and let them go to town making patterned pompom “lights”.  Of course, there are plenty of non-seasonal ideas as well–bodies for an army of little ants or spiders, gumballs in a machine, or play an actual game of BINGO, letting them use pompoms as Bingo “chips”.

Overall, for the two dollars and ten minutes you’ll put into this activity up front, this is a great winter day kids’ activity that gives you a ton of “bang for your buck” in terms of play opportunities.  And hey, there’s no parental hovering or damage control needed–you might even be able to sneak away to wash that load of dishes/read the rest of that article/sneak some cookies in the pantry while your little ones sit in that scary kind of silence.  Relish it!

Leave a comment

Filed under Crafts, Kids' Activities

Chewy Double Chocolate Cookies

chocolatecookiesAnyone who knows me closely knows that I am a bit of a chocolate fiend. In fact, dessert just isn’t really dessert to me unless it contains something chock full of cocoa-y goodness. Just ask my sister-in-law, Jen, our family dessert-maker extraordinaire, who knows that she should pretty much not show up to a potluck dinner with a dessert featuring fruit, or custard, or cream (it’s not that I have anything against those items, but, hey, they just can’t hold a torch against my beloved chocolate).

That’s why, even at this time of year, I still most often forego the gingersnaps, the whipped shortbread, and the salted toffee in favour of recreating, time and time again, my most crowd-pleasing cookie recipe. This double chocolate cookie is a perfect 10/10 in my books, ticking all the boxes of what makes the flawless cookie: the inside is soft and chewy while the flattened outside is just the slightest bit crispy. And, of course, it’s decadently chocolatey and perfect for dunking in milk, if that’s your thing (I’m sure it would be Santa’s thing, if you’re looking for a Christmas Eve cookie recipe for the big guy!).

Also, if you’re looking for something to contribute to a Christmas bake sale tray or holiday Cookie Walk, this recipe won’t disappoint (I get requests to bring this specifically every single year to my holiday-themed events–so why mess with a good thing?). If you want to festive it up a little bit, you can make one ammedment that my sisters and I made last week for a Christmas charity event: we made  peppermint chocolate cookies instead and subbed out the chocolate chips for smashed candycane pieces (you could also add BOTH in equal parts if you really want the deluxe chocolate experience) and then we topped each cookie with either a Peppermint Hershey’s Kiss or another sprinkling of candycane pieces about 30 seconds before their bake time was done (this was long enough to ooze the kiss into the cookie top but not long enough to melt it into a total puddle). My sister reported that they again went like hotcakes at the big gala, and I’ve received several requests for this recipe this week alone, so here it is: the one and only double chocolate cookie recipe you’ll ever need for the rest of your life. Enjoy, and share the goodness with all your friends and neighbours (and maybe you’ll end up with shoveled walks in return!).

 
Chewy Double Chocolate Cookies

2 cups all-purpose flour

¾ cup cocoa

1 tsp. baking soda

½ tsp. salt

1¼ cups butter or margarine

2 cups sugar

2 eggs

2 tsp. vanilla extract

1 2/3 cups chocolate chips*

(* optional Christmas twist: fully or partially substitute smashed candy cane pieces, then later top each cookie with a Peppermint Hershey’s Kiss or some extra candycane pieces 30 seconds before the cookies come out of the oven)

  1. Preheat oven to 350°F.
  2. In a medium mixing bowl, stir together flour, cocoa, baking soda, and salt.
  3. In a large mixing bowl, beat butter and sugar together until light and fluffy.  Add eggs and vanilla and beat well again.  Gradually add in flour mixture, beating well.  Stir in chocolate chips.
  4. Drop cookies by rounded heaped teaspoons onto an ungreased cookie sheet.  Bake 8-9 minutes (do not overbake–the cookies will appear soft and slightly underdone when removed from oven, but they will come to the perfectly chewy texture as they cool).  To prevent bending and breaking, cool cookies for 5-10 minutes on the baking sheet before attempting to remove them to a wire rack.

Makes 2-3 dozen generous, medium-sized cookies.  Cookies freeze well if needed.

chocolatecookiesmint

Leave a comment

Filed under Chocolate, Christmas, Cookies, Sweets, Uncategorized

Soul-Soothing Peanut Stew

peanutsoup.jpg
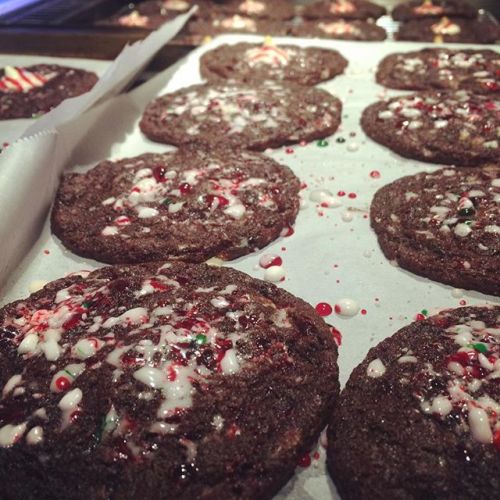
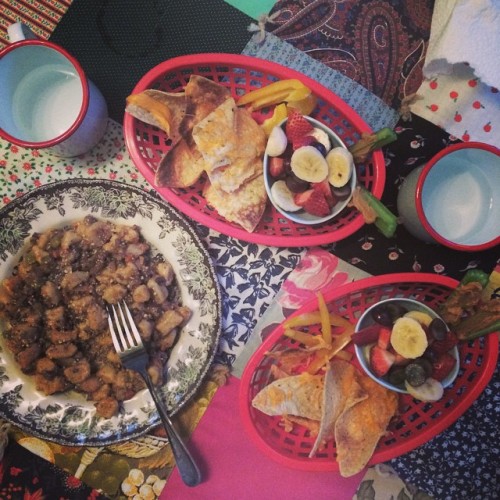
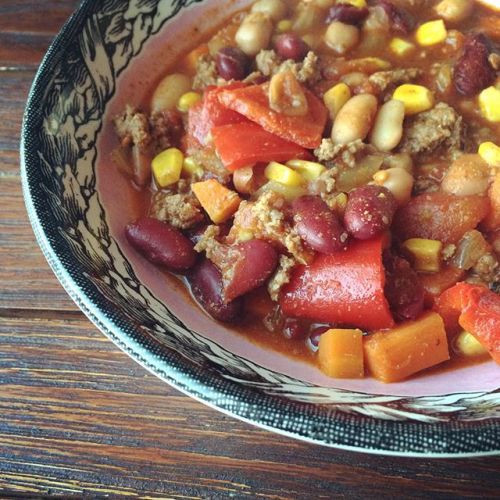
Last month my good friend Jessica invited us all over for a big old family dinner and served up this amazingly delicious vegan stew that converted even the most skeptical eyebrow-raisers among us (none of us are vegans).  More of a hearty, chunky soup than a stew, this tomatoey, earthy recipe went down far too easily, and together us four adults ladled out seconds and even thirds of its steaming goodness until the pot was nearly empty.  With a load of good, dunkable bread on the side and a bit of salad to make it a fuller meal (I brought a north-African type of salad to match), we left the table feeling absolutely stuffed and not at all missing our animal products.

As we tidied up the dishes afterwards, I begged the recipe from Jessica, saying I had to make this again someday soon.  It comes from the cookbook The Oh She Glows Cookbook: Vegan Recipes To Glow From The Inside Out by blogger Angela Liddon (affiliate link).  Now, I may not be ready to hop on over to a full baconless lifestyle quite yet, but we do enjoy one or two meatless meals a week to benefit our health/environment/wallets, and so I’m sure this cookbook would provide a lot of great “Meatless Monday” inspirations, too.

For now, though, I did go home and recreate this recipe, making a few tweaks here and there for taste’s sake as well as according to what I had on hand (I used chicken broth although the original calls for vegetable broth).  The supermarket also had not only orange sweet potatoes, but also purple yams, so I added those, as well as a bag of frozen, cooked brown rice that I had lurking as leftovers in my freezer.

This recipe came together from start to finish in about 20 minutes or so (including chopping & peeling time).  It made enough for two supper meals for our family–one to save in the fridge for a night this week when we have to dash off to sports lessons, and one for the freezer, “for a rainy day”.  Vegan or not, you’ve really got to try this one!

Soul-Soothing Peanut Soup

Serves 6-8; adapted slightly from the book The Oh She Glows Cookbook: Vegan Recipes To Glow From The Inside Out

1 tsp olive oil

1 medium onion, diced

3-4 cloves garlic, minced

1 red bell pepper, diced

1 medium sweet potato, peeled & diced (or combine orange & purple sweet potatoes in same amount)

1 can of diced tomatoes (28oz) with liquid

1/3 cup peanut butter

4 cups of chicken broth (or, use vegetable to make it vegan)

2 tsp chili powder

¼ tsp cayenne pepper

1 can of chickpeas, drained & rinsed

2 cups baby kale or spinach

salt & pepper

optional: a little jalapeno or red chili flakes if you’d prefer it spicier

optional: 1-2 cups of cooked rice or grains

garnish: fresh cilantro and chopped peanuts

  1. Heat oil in large saucepan.  Add in onions and sweet potato chunks to soften slightly.  Add in garlic and sauté til fragrant.
  2. Add in canned tomatoes with their liquid, red bell pepper, peanut butter, and broth.  Stir until combined, whisking the peanut butter if necessary.  Add chili powder and cayenne (as well as optional jalapeno or chili flakes).
  3. Bring to a boil, then reduce heat to low and simmer, partially covered, for 10-15 minutes or until sweet potato chunks are fork-tender.
  4. A couple minutes before serving, add in the chickpeas and kale/spinach, allowing it to wilt down slightly.  Add/adjust salt & pepper to taste.  If adding rice/grains, do so right before serving.
  5. Serve in bowls with chopped cilantro and peanuts overtop as garnish.

1 Comment

Filed under Freezer Meals, Make Ahead Meals, Quick, Recipes, Soup, Stew

Easy Kids’ Lunch: Corn Cake Fries

cornfriesIf you have little kids, I’m certain you’ve hit the obstacle I have: the lunch rut.  Stuck in a spiral of PB&Js?  Find yourself scrounging together pantry lunches comprised of a handful of trail mix and dry Cheerios, half a banana, and a single flap of lunchmeat? I have a solution for you!  I guarantee that even the pickiest child eaters in your brigade probably like either pancakes or fries, and this little ingenious recipe that I devised in a moment of desperation can be spun to them as being either of those things.  Come on, people, half of successful parenting is just clever rhetoric, after all  (for adults, go on and call them “corn cakes” and they will be equally adored).

For us, these corn cakes are the perfect thing to whip up after kindergarten pickup, when we’re all getting hangry and need something hot in a jiffy.  I love that these come together with ingredients that I always have on hand, so even when I feel like I am “out of food”, these are an option to make.

As always, this flexible recipe can accommodate a bit of tinkering with, as long as you keep in mind that it should be just slightly denser than regular pancake batter (so add a tiny bit more milk/flour as needed) : shred in a bit of zucchini or carrot, add a dash of hot sauce or hot pepper flakes, or grate in a bit of cheese to make these a little more exciting.  But know that the base recipe, with a healthy dollop of ketchup on the side, is more than good enough–not only for the kids, but for the parents, too ;)

Corn Cake “Fries”

1 cup flour

½ cup cornmeal

½ tsp salt

pepper to taste

1 cup milk

1 egg

1 tbsp oil

½ cup kernel corn (canned or thawed frozen)

optional: other mix-ins (cheese, shredded zucchini, hot sauce, etc)

  1. In a large bowl, mix together flour, cornmeal, salt & pepper.
  2. In a smaller bowl or measuring cup, whisk together the milk, egg, and oil.  Stir all at once into the dry ingredients and stir just til combined.  Add in the kernel corn (or any other mix-ins) and stir only til incorporated–batter can be slightly lumpy. (At this point, add a little flour or milk as needed to make the dough like slightly thicker pancake batter).
  3. Let batter sit for 10 minutes to soften cornmeal.  Preheat a skillet to medium-high heat.
  4. Grease skillet with butter, oil, or spray.  Pour 1/4 cup of batter at a time to form small pancakes.  When bubbles begin to form, turn the pancake over and fry the other side, compressing slightly with a spatula.
  5. When both sides are golden and the filling is cooked through, remove pancake from the heat and cut it into strips (aka “fries”).  Serve stacked up on a plate with ketchup for dipping.


Leave a comment

Filed under Breads, Kids' Meals, Low Prep, Quick, Recipes, Snacks